Python on MeluXina
The MeluXina system environment provides the Python programming language.
EasyBuild module description
Python is a programming language that lets you work more quickly and integrate your systems more effectively.
You can use Python to run your applications.
Python usage
Interactive
Reserve an interactive session:
salloc -A COMPUTE_ACCOUNT -t 01:00:00 -q dev --reservation=cpudev -p cpu -N 1
The example above will allocate one CPU node in interactive mode (dev QoS with cpudev reservation) . You can use Python in two different ways:
- Interactively by login into Python programming language environment through terminal.
- By running a Python script containing all your command necessary for your program to run.
See examples below:
Using Python
Check Python versions available on the system with module command:
module avail Python
Terminal output example
     Python:
     ---------------------------------------------------------------------------------------------
     Description:
     Python is a programming language that lets you work more quickly and integrate your systems more effectively.

     Versions:
        Python/2.7.18-GCCcore-10.2.0
        Python/3.8.6-GCCcore-10.2.0
     Other possible modules matches:
        Biopython  flatbuffers-python  protobuf-python

     ---------------------------------------------------------------------------------------------
     To find other possible module matches execute:

       $ module -r spider '.*Python.*'

     ---------------------------------------------------------------------------------------------
     For detailed information about a specific "Python" package (including how to load the modules) use the module's full name.
     Note that names that have a trailing (E) are extensions provided by other modules.
     For example:

     $ module spider Python/3.8.6-GCCcore-10.2.0
     ---------------------------------------------------------------------------------------------

Load the Python module.
``` bash
module load Python
```

Log into the Python environment
```bash
python
```

??? success "Terminal output example"
    ```bash
    Python 3.6.8 (default, Aug 18 2020, 08:33:21)
    [GCC 8.3.1 20191121 (Red Hat 8.3.1-5)] on linux
    Type "help", "copyright", "credits" or "license" for more information.
    >>> import sys
    >>> print(sys.version)
    3.6.8 (default, Aug 18 2020, 08:33:21)
    [GCC 8.3.1 20191121 (Red Hat 8.3.1-5)]
    ```
Python can also be used interactively to run your python script programs.
#Load Python module
module load Python

#Run your Python script
python my_python_script.py
Batch
Python can also be used in a batch job using Slurm. The script below runs a Python program through a script on one CPU node allocated for 1 hour.
#!/bin/bash -l
#SBATCH -N 1
#SBATCH --ntasks=1
#SBATCH --cpus-per-task=1
#SBATCH -p cpu
#SBATCH -q test
#SBATCH --time 01:00:00

#Load Python module
module load Python

#Check Python version
python -c  'import sys; print(sys.version)'

#Execute the program
python my_python_script.py
Python environment
Our Python installations only come with some standard packages (including the standard library). Your applications may use and need packages or versions (for different reasons such as bug fixes or obsolete version) that are not part of our standard packages. Our Python installation can therefore not meet all requirements of every application. One solution is to create a self-contained tree that contains a Python installation for a particular version of Python, plus a number of additional packages: Python virtual environment.
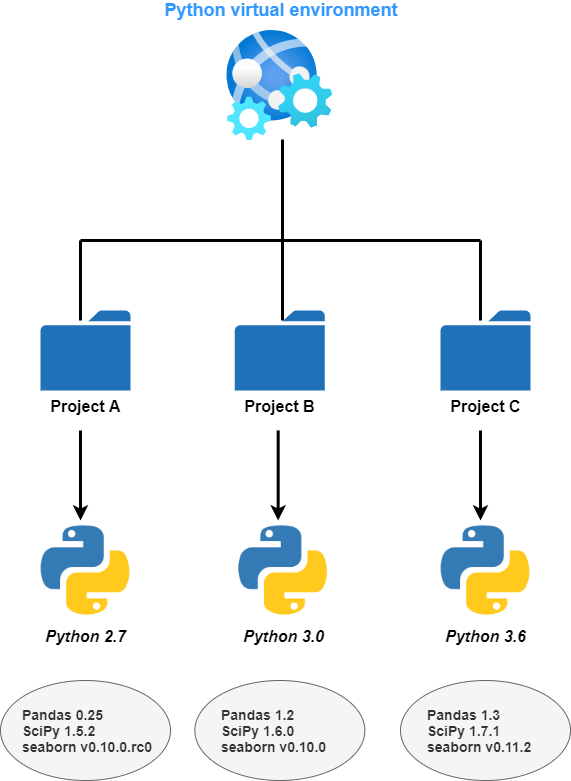
A virtual environment is a Python tool for dependency management and project isolation. They allow Python site packages (third party libraries) to be installed locally in an isolated directory for a particular project, as opposed to being installed globally (i.e. as part of a system-wide Python).
Creating virtual environment using the venv module
Run the following command to create a python virtual environment:
python3 -m venv my_python-env
The command above will create the my_python-env directory if it doesn't exist, and some other directories containing the standard library and the Python (3) interpreter.
Activate the virtual environment to modify your current environment. Therefore, running python will get you the version installed in the virtual environment (python 3 in our example).
source my_python-env/bin/activate

python
terminal output example
Python 3.6.8 (default, Mar 19 2021, 05:13:41)
[GCC 8.4.1 20200928 (Red Hat 8.4.1-1)] on linux
Type "help", "copyright", "credits" or "license" for more information.
>>> import sys
>>> sys.path
['', '/usr/lib64/python36.zip', '/usr/lib64/python3.6', '/usr/lib64/python3.6/lib-dynload', '$HOME/my_python-env/lib64/python3.6/site-packages', '$HOME/my_python-env/lib/python3.6/site-packages']
>>>
It can be noticed that the standard library is loaded from $HOME/my_python-env/ virtual environment directory.
Installing your own packages
From within an interactive session
It is possible to install any packages required by your Python program in your virtual environment directory using the pip program/command.
python -m pip install pandas scipy seaborn
or request a specific version of the package:
python -m pip install pandas==1.1.5 scipy==1.5.4 seaborn==v0.11.2
Terminal output example
Successfully installed pandas-1.1.5 scipy-1.5.4 seaborn-0.11.2
Batch mode
The python virtual environment can also be set up from a batch(slurm) job. The example below shows a python program requiring specific packages from a standard library:
#!/bin/bash -l
#SBATCH -N 1
#SBATCH --ntasks=128
#SBATCH --cpus-per-task=1
#SBATCH -p cpu
#SBATCH -q test
#SBATCH --time 01:00:00

#Load Python module
module load Python

#Check Python version
python -c  'import sys; print(sys.version)'

#Create the virtual environment
python -m venv my_python-env

#Source to activate the virtual envronment
source my_python-env/bin/activate

#Install the dependencies(listed in requirement.txt) with pip in the virtual environment
python -m pip install -r requirements.txt

#Execute the program
python my_python_script.py
requirement.txt contains all the necessary packages for the python program to be run.
Using Miniconda for Creating Virtual Environments
An alternative solution for creating virtual environments is to use Miniconda. However, be cautious of the disk space consumed when installing packages, as Conda creates temporary files in a cache directory to speed up subsequent installations. This can quickly consume all the space in your $HOME directory.
Therefore, we recommend installing Miniconda outside your $HOME directory. In the following instructions, we will use a fictitious project directory. Assume our project directory is /project/home/p200xxx. Let's define this directory as follows:
export WDIR="/project/home/p200xxx"
Setting Up Miniconda
Create the directory where Conda will be located:
mkdir -p $WDIR/conda_base_path/
cd $WDIR/conda_base_path/
Now, run the following commands to install Miniconda:
# Download the Miniconda installer
wget https://repo.anaconda.com/miniconda/Miniconda3-latest-Linux-x86_64.sh

# Verify the installer (optional)
sha256sum Miniconda3-latest-Linux-x86_64.sh

# Make the installer executable
chmod +x Miniconda3-latest-Linux-x86_64.sh

# Run the installer
./Miniconda3-latest-Linux-x86_64.sh
During the installation, after agreeing to the license agreement, specify the installation directory as $WDIR/conda_base_path/miniconda3. If not specified, everything will be installed in your $HOME directory by default.
After the installation, source the shell configuration to update the current session:
source ~/.bashrc
Initialize Conda if it was not done during the installation:
conda init
Verify the installation with:
conda --version
Ensure everything is installed outside the home directory:
conda info --envs
# base                     /project/home/p200xxx/conda_base_path/miniconda3
Check the cache directory location:
conda info | grep cache
# /project/home/p200xxx/conda_base_path/miniconda3/pkgs
Creating a Virtual Environment
To create a new virtual environment, run:
conda create --name newEnvLXP python=3.11.3
Verify the new environment is listed:
conda info --envs
# base                     /project/home/p200xxx/conda_base_path/miniconda3
# newEnvLXP             *  /project/home/p200xxx/conda_base_path/miniconda3/envs/newEnvLXP
Activate the virtual environment:
conda activate newEnvLXP
Check that the Python binary is from the new virtual environment:
which python
# /project/home/p200xxx/conda_base_path/miniconda3/envs/newEnvLXP/bin/python
Installing Python Modules
Once the virtual environment is activated, install the necessary modules:
conda install numpy pandas
Ensure the modules have been installed in the site-packages directory of the virtual environment:
ls /project/home/p200xxx/conda_base_path/miniconda3/envs/newEnvLXP/lib/python3.11/site-packages/
By following these steps, you can effectively manage your Conda installations and environments without consuming excessive space in your $HOME directory.